Navigating your Family History in Tableau by Chris DeMartini
/Context
A while back, I was talking to my mom about one of her passions, tracing the history of our family lineage. She has spent more time on this than I can really comprehend at this point and has traced our family all the way back to the 1600s (cheers to you mom!). During the discussion I asked her to show me my ancestor tree. She said no problem, and then printed out 23 pages of paper containing my ancestor tree, which she then taped together and laid out on the floor shown below.

This does show my family tree, but I wondered if I could help my mom out with the following challenges presented by her genealogy software’s reporting limitations:
- Generating the tree was a time consuming process. She had to print, tape and then find a place large enough to view the tree.
- The size of the tree is not conducive to review, you literally have to walk several feet to review it (which is why you see my left foot twice in the above picture). Also, looking at more than one tree at a time would be extremely difficult and take up most of the floor space in the house.
- The tree was static. She had to select a root, direction (ancestor/ descendant) and then print, tape, etc. Then repeat this for each root from which she wanted to view lineage.
- Information was limited to what could fit in the box allocated to each person in the tree. The tree was 1 dimension, additional context cannot easily be added or modified.
- And let’s face it, the tree print out is not very tree friendly (pun intended).
So, now that we know what we are trying to fix, how do we go about this. Obviously, I immediately started to see the value that Tableau and its interactive nature could bring to my mom’s research. We can address all the issues mentioned above just be leveraging Tableau’s native functionality and a few tricks.
The Viz
We are going to build two tree views in Tableau, an ancestor view and a descendant view of a dynamically selected root person. Within this post I will walk through building the ancestor tree (a binary tree), feel free to reach out if you want more information on how the descendant tree was built, but will leave that to the imagination for now.
First things first, the credits. I started this effort with two main inputs, (1) the node tree link diagram that was explained and created by Jeffery Shaffer and (2) the dynamic parameter posts that Nelson Davis recently went through. I rely on both of these to get to the family tree viz shown here. In addition to these, I also asked Allan Walker, Noah Salvaterra and Anya A’Hearn for general help and guidance along the way. Also, thanks again for lending your blog Anya!
Quickly on the underlying data format. For the most part it is the same overall setup as shown in the Hive plot post. Refer back to that (or the workbook itself) to dig into how the underlying data has been structured to support the visualization shown here.
One of the most important aspects of building the viz is how to place the various nodes within the viz. From there we will leverage Shaffer’s node tree link diagram with a tweak to place the curved lines in between our nodes. Everything will be based from the root node and built up or down from there.
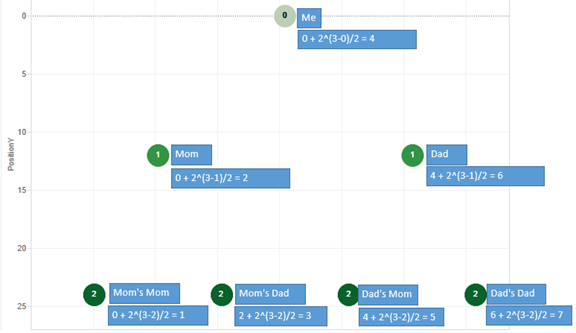
Onto to node placement already! The Y-axis of the node placement is simpler for this use case. We are going to assign a Y value based on the node’s generation. Root node is generation 0, parents are generation 1, and grandparents are generation 2 and so on. Then in order to leverage Shaffer’s curve equation for our tree we multiply the generation by 12.

Now the hard part, where do we put the nodes on the X-axis. I have two solutions for this, one for ancestor where we have two and only two parent nodes and another for descendants where we have 1 to N child nodes. As mentioned, we will walk through the ancestor tree view in this post.
When examining the ancestor tree, we see that each generation has two to the power of N worth of nodes. For example:
- Generation 0 (Root Node) is 2^0 = 1 node
- Generation 1 (Root’s Parents) is 2^1 = 2 nodes
- Generation 2 (Root’s Grandparents) is 2^2 = 4 nodes
- Generation N is 2^N nodes
So our tree width needs to increase by this factor as we continue to add generations to the tree. I also enforced a rule that all females will be on the left side and all males will be on the right. As a result of this rule, we need to keep track of how many males are in the lineage of the specific node we are trying to place. Here is a table breaking down how I went about the calculation for Position X. Disclaimer: the [XPosStart] and the generation counter ([A]) were both created outside of Tableau using a recursive CTE in SQL Server (reach out if you want the nitty gritty on this). If you have successful feedback on the way to implement this recursive calculation step in Tableau, I’ll have a beer waiting for you at TCC15. I am sure it can be done, but faster for me in SQL Server.

Placing Position Y on rows and Position X on columns your view should now look something like this, the nodes have now been placed in the tree structure (also showing the Position X calculation again for each node).
Onto the curves we go. First thing we need to do is add a bin field to generate the path of the curves. We have a field (SigmoidBandT) that is -6 for starting point and 6 for ending point of a node relationship. We bin this field by 0.25 to densify the data and execute the curve equation (make sure show missing values is selected!).

When using data densification, we have to be sure to leverage window aggregates for all of the relevant coordinate fields which are needed to drive curve calculations. The start/end points for X and Y coordinates are shown below. One key note is to leverage the FIRST() and LAST() functions to make sure you are only referring to either the start or end point of your paths respectively.

Now that we have our bin and windowed coordinates we can build our curves from our parent to child nodes. This is done with two equations (which I found in Shaffer’s node-link tree diagram) shown below, Sigmoid Curve and SigmoidT2Index. One other key field in the formulas is Sigmoid Function, this actually does the math behind the x-value of the curve. (Refer to the work book for the additional calculated fields nested within these formulas.)

We replace the rows and columns shelf with the fields mentioned above and place the bin (showing missing values) and path fields on the detail shelf, and we now have curves.

One very useful thing that I got from Shaffer’s post was how to do the dual axis when using curved lines. He created a field call Points which is a table calculation that only has a value on the first or last value of a group. I did have to add Node to the detail shelf for Points to work correctly, here is the equation and the updated tree result (now looking a lot like a red-black tree).

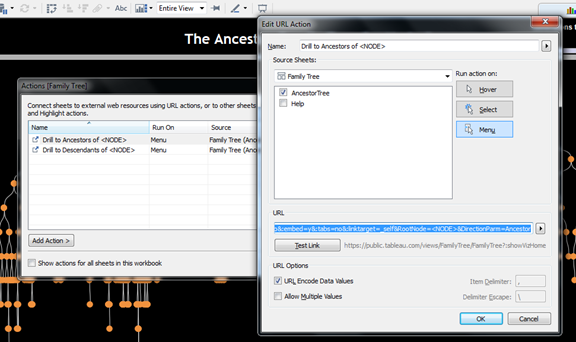
One last requirement we need to meet is the ability to drill through on any node in the view and see the ancestor or descendant tree from that specific node’s perspective. Here we will leverage the URL action “hack” that Nelson Davis recently blogged about here. Take a look at the details he posted to get a great overview of how this process works and the various pieces of the URL string required for this to work. In addition to this, the other step I had to take was to “cache” the data for the ancestor/descendant tree views having each node as the root. This data preparation work was done in SQL Server in this example and is only required since Tableau Public has limited data connections allowed and data extracts required. You can take advantage of live connections to get around this additional caching step and generate the tree on the fly within your data connection configuration.
So I added two dashboard actions, one for ancestor and one for descendant which use the above mentioned URL trick to hack “dynamic” parameters driving the root node and direction of the tree view. This sends the selected node to our root node parameter and also sends the direction to our direction parameter. Here is an example of the URL action string, I have highlighted the root node and direction parts in green below …
https://public.tableau.com/views/FamilyTree/FamilyTree?:showVizHome=no&:embed=y&:tabs=no&:linktarget=_self&RootNode=<NODE>&DirectionParm=Ancestor
Here is what the URL action menu looks like within the viz…
Now, when working on public, we can select any node in the viz and then reset the tree view to either the ancestor or descendant view. Here is the result of selecting ancestor and then descendant views for my grandma on my dad’s side…

There are bits and pieces that I have left out of this post to try and keep it from getting too long (still totally failed at that goal). These can all be reverse engineered from the workbook provided or free feel to ping me at @demartsc with any questions.
Mom – I hope you find this helpful!
