The 3D Tableau Full Monty
/Now that we have the post on the visual best practice, orthographic views out of the way, let's move on to some 3D-giltter! We have all seen Noah's Tesla. Seriously sweet. Have you tried it with the chroma-scale glasses yet? Bora Beran taught us all how to 3D in Tableau . Allan Walker, has done a lot with Star Wars 3D in Tableau, and the amazing Ken Black has done brilliant 3D geological work including animation. While at #TC16, Allan, Noah and Philip Riggs were working on a 3D model of the earth in Tableau including terrain elevation in support of the #VisualizeNoMalaria project.

Thanks to all their work that paved the way, we can now all get in on the fun! We also want to proudly introduce the amazing Philip Riggs, co-author of this post, and the creator of the free Alteryx Gallery App to convert your 3D files to a .tde for use in Tableau! Thank you Philip!!! He is also a new Blick-Blogger!
Jonathan Drummey was fortunate enough to attend Philip's presentation at Alteryx Inspire in San Diego on Improving Avian Influenza Emergency Response with Alteryx. Philip is a Technical Information Specialist at the US Department of Agriculture, Veterinary Services, where he specializes in geospatial analysis, data visualization, and automating data processing workflows for a wide variety of animal health and epidemiology projects. At the conference, they got to discussing the Alteryx for Good program and Philip graciously volunteered to help with the #VisualizeNoMalaria campaign. Through that project as well as meeting in person at #TC16, Philip has become part of the DataBlick extended family!
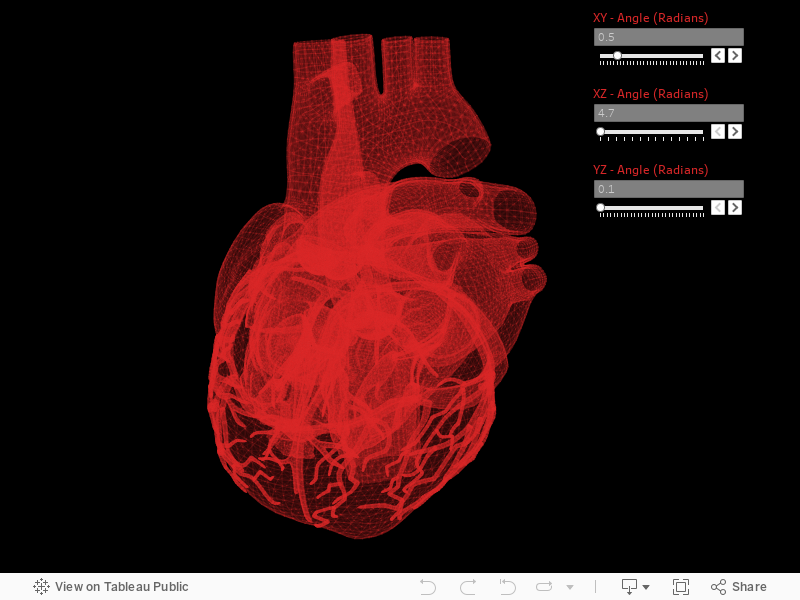
Having studied Industrial Design in Grad School, I of course wanted to play away with 3D models and bring them into Tableau too as with the heart below.
Recently DataBlick had a client project dealing with analyzing parts on a car during manufacturing and transport, and the client wanted something like Noah's Tesla. We all want a Tesla, right? Well, now you can have one (in Tableau at least). In this post, I'll walk you through how to find a 3D model and get it into Tableau. The next post will show how to trick it out a little bit as well as "explode" parts in a 3D tool before bringing them into Tableau so you can highlight and interact with them on your dashboard.
Let's get started with bringing a 3D model into Tableau. Unless you are talented enough to build your own Tesla in a 3D tool, you can search online for any number of 3D models that are available for download. Sketchup has an extensive warehouse to choose from. Other places to look are GrabCAD, and any number of Blender community sites. Find one you like and remember to note the creators name for attribution! If you happen to find one that is in the .stl format, great! If not, we will show you how to convert a 3D file in many different formats to .stl.
I found a Tesla in the Google Sketchup Wharehouse by someone who goes by captainkirk . You can download the same one if you like. There are several options, but to do the conversion in Blender, please select the Collada file to download. Unzip the downloaded file if it was zipped.

Once you have imported the model into your 3D tool, it needs to be converted into a .stl file.
Any number of 3D tools can do this conversion, such as Rhino3D, Solidworks, etc. You can even convert 3D files online such as with MeshConvert. without needing to download software (if the file is under 5MB).
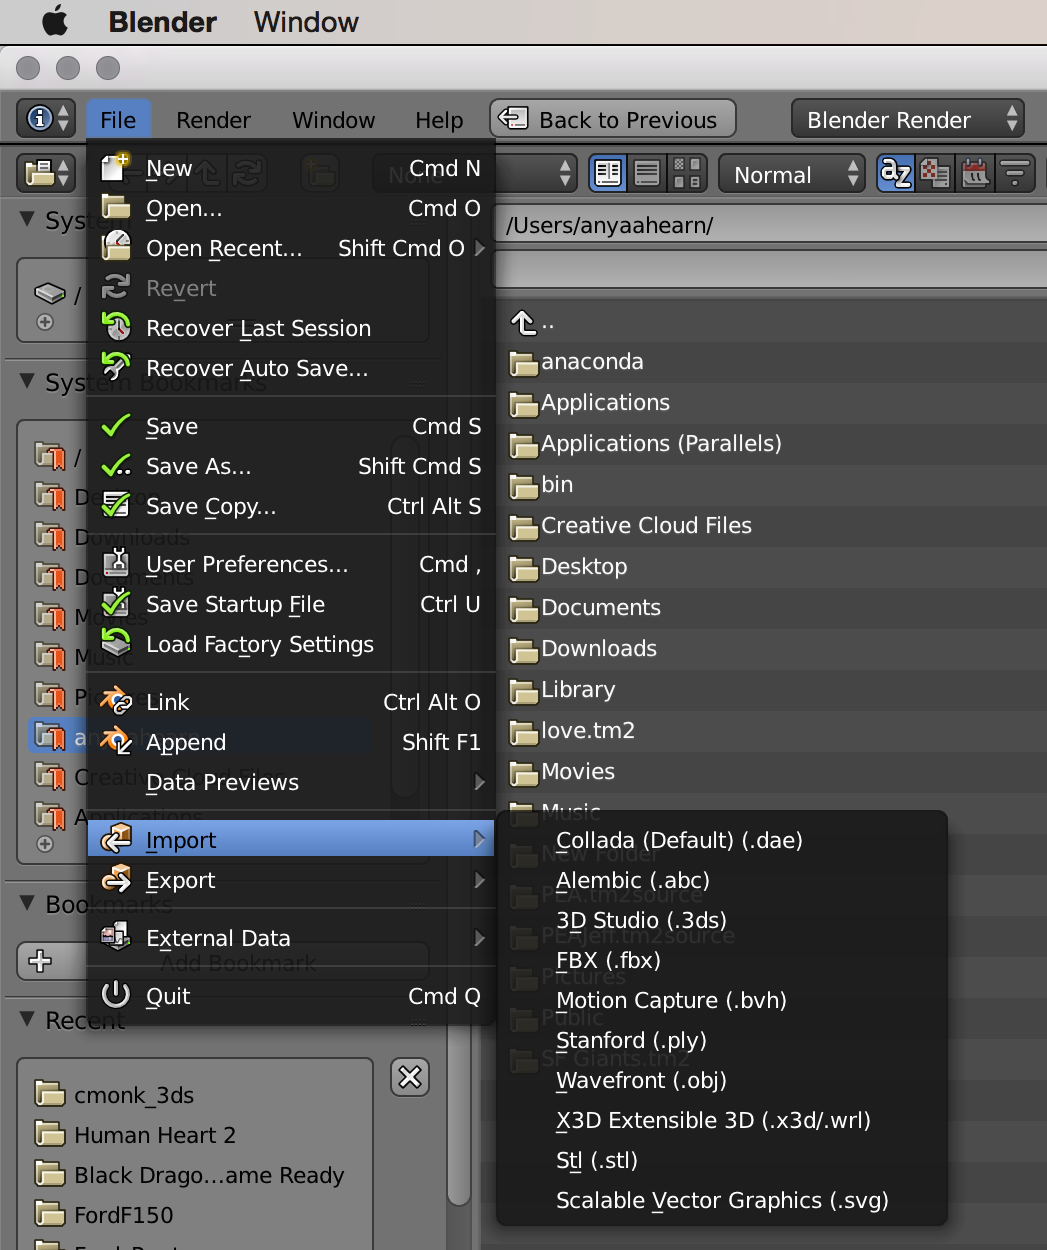
For this tutorial let's all use Blender. In Blender, as it is an open source 3D tool. Import your downloaded model from the File menu, select Import, and then select the Collada (default) (.dae) file option. If you downloaded another file type, you can most likely import it into Blender as well. See below for supported file types.
Your Tesla will now be inserted in the Blender model. There are some other items that are in the default setup that we can remove before we export.

In the upper right in the All Scenes window, delete items like the lighting and the cube to remove them from by right-clicking on them and selecting delete. Once we are left with just the items in our Tesla, go back to the File menu and select Export.

We need to make sure that it is exporting the ASCII version of the .stl, so in the lower left of your screen, there should be a checkbox to select ASCII.
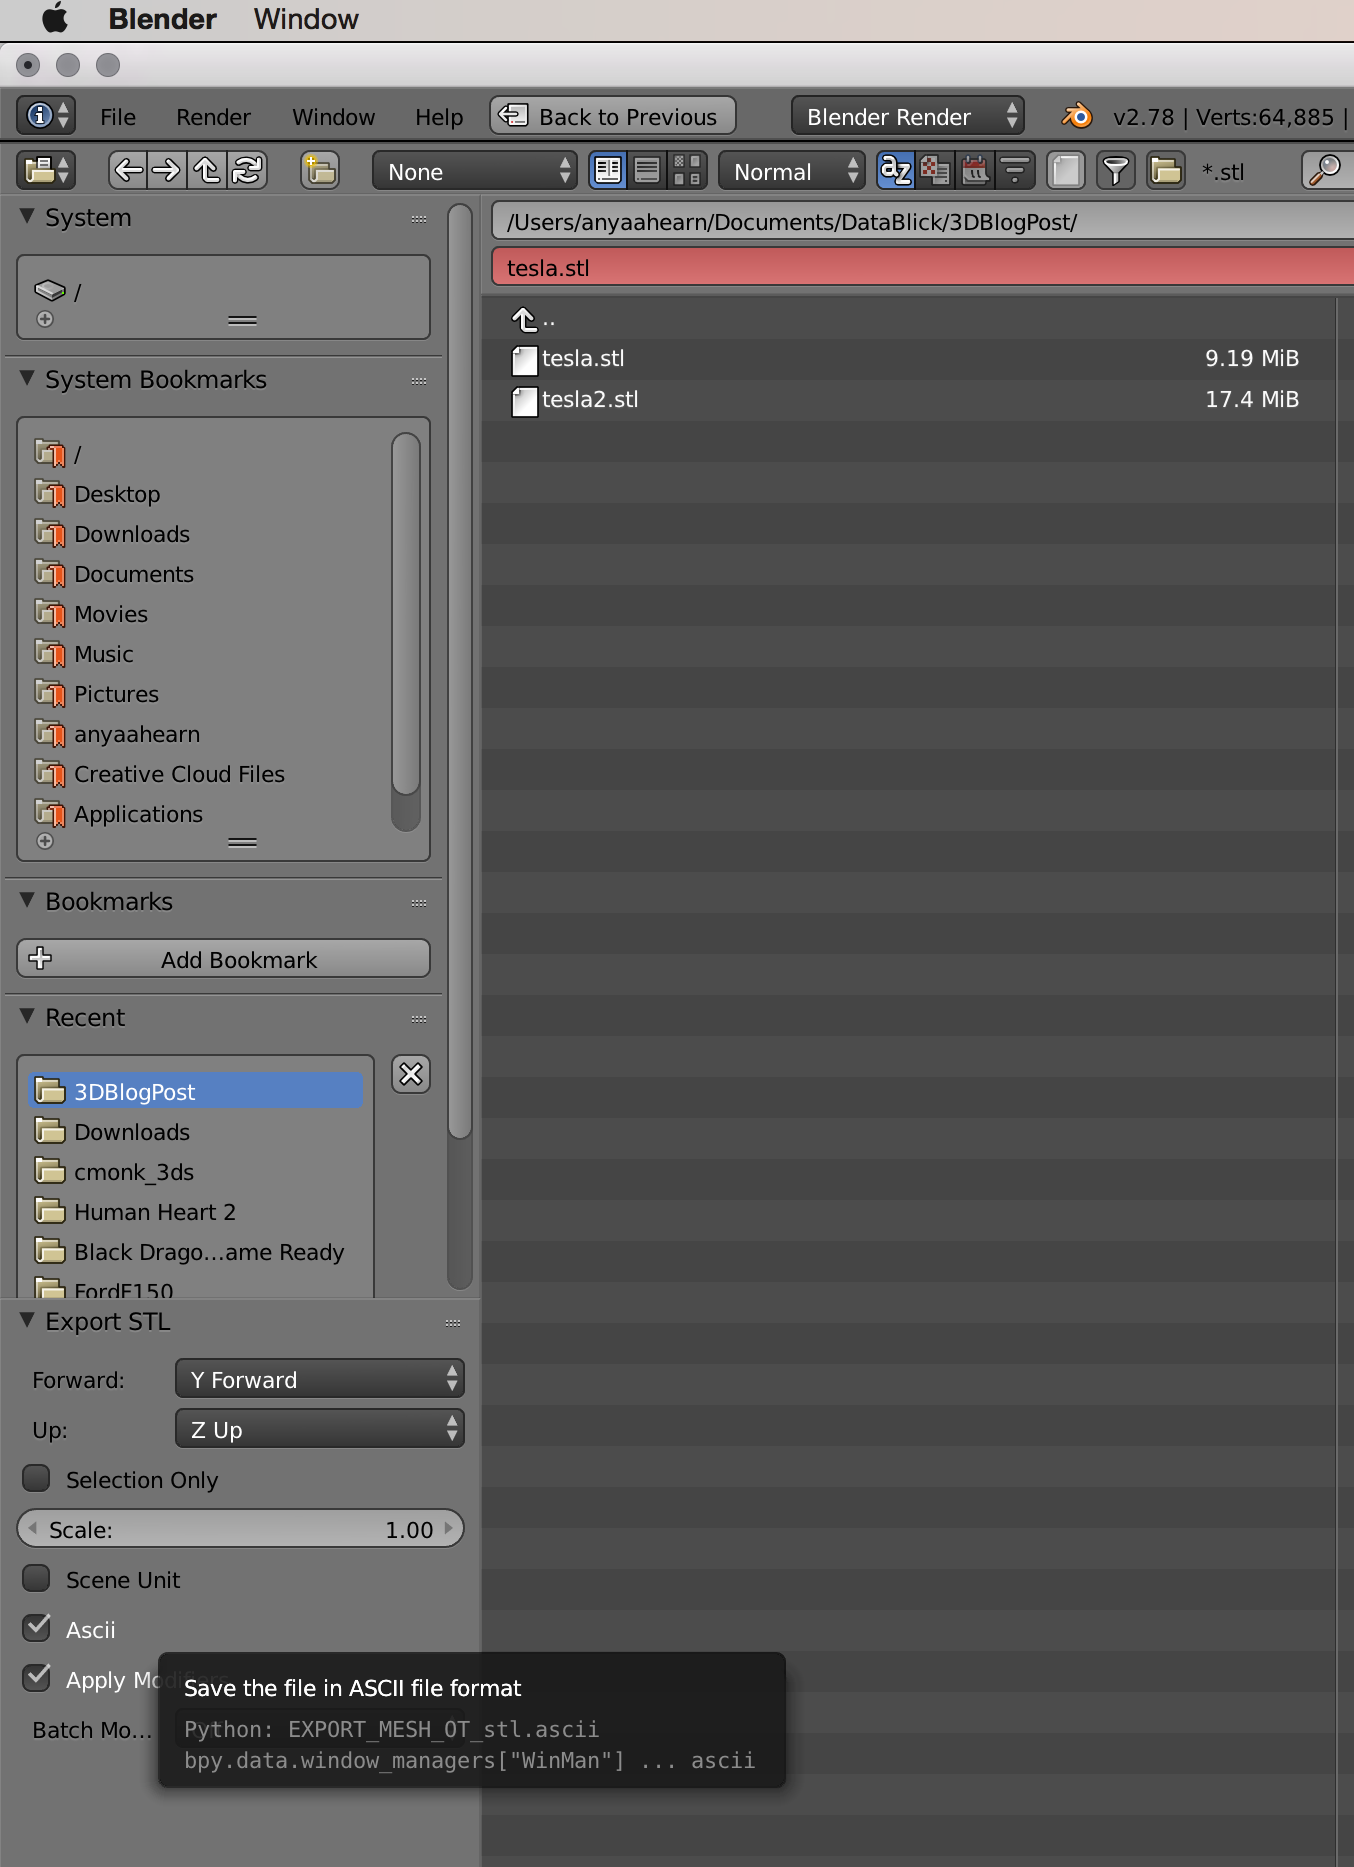
For you crafty Python'ers out there, you can notice the code and bypass all this GUI'ness :-).
What is a .stl file? If you love triangles, you are in for a treat! A STL (STereoLithography) is a file format native to the stereolithography CAD software created by 3D Systems. STLhas several after-the-fact backronyms such as "Standard Triangle Language" and "Standard Tessellation Language". Check out this hot dress made up of triangles, so it doesn't need any seams and can hug every curve. This dress came from a 3D printer. How cool to print your own clothes custom using triangles!


If we look at the .stl file to the right of our Tesla, you can see that it is just made of triangles too! See all those Vertex's grouped in 3's. Those are the corners of the triangles in X, Y, and Z coordinates. All these triangles create the surface of our 3D model in Tableau as well. To get it into Tableau, we will use the free Alteryx Gallery App that Philip created.
The Alteryx App works by reading in the .stl file as undelimited text, removing leading and trailing white space, then filtering to include only the rows that begin with "vertex". Once it has only the vertex rows, Alteryx splits each row into x, y, and z columns. Each row gets a VertexID assigned, starting with 0. The reason VertexID starts at 0 is to make dividing the rows into triangles easy. All it takes is a Formula tool with FLOOR([VertexID] / 3) to create the triangles, called Subpolys for Tableau. This works because FLOOR takes a decimal number and rounds down to the nearest integer. For example, VertexIDs 0, 1, and 2 become 0.000, 0.333, and 0.666 and all are rounded down to Subpolys 0. VertexIDs 3, 4, and 5 become 1.00, 1.33, and 1.66, then are rounded down to SubPolys 1. And so it goes for all the remaining VertexIDs.
After binning the VertexIDs using the FLOOR formula, the rows need be assigned a Path Order for Tableau. Alteryx makes this super easy with the Tile tool. Using the Unique Value option in the Tile tool and choosing VertexID as the Unique Value, grouping by SubPoly. Alteryx goes through the list assigning 1, 2, 3, 1, 2, 3, 1, 2, 3 to each row. Tableau will need this information to create the triangle polygons using the vertices in the correct order. The last step is to change data types from strings to numbers as needed and output the file as a Tableau Data Extract (.tde).
Once you have gone to the link above, click the "Run" button. You will then be able to upload your .stl file, give the output a name and hit "Run" again. It will turn your .stl into a .tde for you to then download.

Now it's time to get it into Tableau. Find your downloaded .tde file and open it in Tableau.
We will use some calculations from the amazing Bora Beran to get our model to be 3D. Download the workbook from the post, and open it to the tab: atoms+ (caffeine.xlsx). Copy all the calculated fields from the Rotated Coordinates folder in the Measures window, and paste them into your workbook, and do the following:
Change the "Subpoly" and VertexID" measures to be Dimensions.
Change the x_rotated to have the Geographic role of Longitude. Double click to add to the worksheet, then change it to be a Dimension. Make sure this is on the Rows Shelf.
Change the y_rotated to have the Geographic role of Latitude. Double click to add to the worksheet, then change it to be a Dimension. Make sure this is on the Columns Shelf.

You should now see some blue circles that look vaguely like a Tesla. In the Marks card area, change the type to either lines or polygons. Each will give a different look, or you can dual axis them to combine the effects. Pick line for now, and notice all the zigzags. We have to tell Tableau the order to draw the points in. To do this, drag the PathOrder onto the Path card, and set it to be the MIN(PathOrder).
Then add Subpoly to the Detail card, followed by the VertexID. Make the line size as tiny as possible and bit transparent. You will now need to add a background image that is 1 pixel by 1 pixel. You can make this in Paint, Gimp or any other drawing tool. Set this image to be -1 to 1 for each of the X and Y Fields as shown below. Change the view to be "Entire View".

Control select all 3 parameters that were added when you copied Bora's calculations, and show their controls. Play with rotating the Tesla until you get the desired angle.
Ta-daaaaaaaaa! You have a Tableau Tesla. Here is what it would look like with using polygons or lines.

And of course, here is the dual axis, done perfectly in Pink!

We can't wait to see what you 3D!
